 Pin it
 The kitchen counter was already covered in red speckles when my roommate walked in and asked if I'd been murdered. I was attempting my first red velvet cake for Valentine's Day, and the food coloring had other plans. That chaotic evening taught me more than any recipe book about the stubborn personality of red dye and the absolute necessity of gel over liquid. Five years later, I've traded the crime scene aesthetic for this playful Betty Boop version that still makes me smile every time I pull it from the oven.
My niece's birthday party last winter changed everything about how I approach decorating. She spotted me struggling with piping bags and perfect rosettes, then grabbed a chocolate bar and suggested we draw something instead. We ended up making the messiest, most joyful silhouette toppers I'd ever seen, and the kids were more excited about those chocolate cutouts than any professional frosting work I'd done. Now I always keep melted chocolate on hand for the moments when precision feels overrated.
Ingredients
- Cake flour: The lower protein content creates that velvety tender crumb red velvet is famous for, so don't substitute with all-purpose unless you want a tougher texture.
- Natural cocoa powder: Unlike Dutch-processed, this acidic cocoa reacts with the baking soda and vinegar for that signature reddish hue and light lift.
- Room temperature butter and eggs: I learned the hard way that cold ingredients create a lumpy batter that doesn't trap air properly, leading to dense sad cakes.
- Buttermilk: This tangy liquid tenderizes the gluten while activating the baking soda, creating those delicate velvet-like pockets in the crumb.
- Red gel food coloring: Gel delivers concentrated color without adding excess liquid that would throw off your batter's chemistry.
- Double vinegar trick: White vinegar in the batter enhances the red color, while that final teaspoon mixed with baking soda creates an extra lift.
- Cream cheese frosting: Let everything come to room temperature before beating, otherwise you'll end up with lumpy frosting and a seized mixture that tastes like disappointment.
- Dark chocolate or candy melts: These create that snap against the soft cake and hold their shape better than milk chocolate for silhouette work.
Tired of Takeout? 🥡
Get 10 meals you can make faster than delivery arrives. Seriously.
One email. No spam. Unsubscribe anytime.
Instructions
- Get your mise en place ready:
- Preheat your oven to 350°F and grease two heart-shaped pans with butter, then line the bottoms with parchment paper for perfect release.
- Whisk the dry team:
- In a medium bowl, sift together the cake flour, cocoa powder, baking powder, baking soda, and salt until everything is evenly distributed.
- Cream the butter and sugar:
- Beat that butter for a full minute until creamy, then gradually add sugar and let it go for another 2-3 minutes until the mixture looks pale and fluffy like vanilla clouds.
- Add the eggs one by one:
- Drop in each egg individually, beating just until blended, and don't forget to scrape down the bowl so everything incorporates evenly.
- Make it red:
- Pour in the red gel coloring, vanilla, and vinegar, then mix until the batter transforms into that shocking vibrant crimson that makes red velvet so dramatic.
- Alternate wet and dry:
- With the mixer on low, add one-third of the dry ingredients followed by half the buttermilk, repeating until everything's just combined and being careful not to overmix.
- The magic moment:
- Stir that last teaspoon of vinegar into the baking soda, watch it foam up like a tiny science experiment, then gently fold it into the batter for extra lift.
- Bake until perfectly set:
- Divide the batter between your prepared pans and bake for 25-30 minutes until a toothpick comes out clean and the layers spring back when touched.
- Cool completely:
- Let the cakes rest in their pans for 10 minutes, then turn them out onto wire racks and walk away until they're completely cool or the frosting will melt right off.
- Make the frosting:
- Beat room temperature cream cheese and butter until smooth, then gradually add powdered sugar, vanilla, and a pinch of salt until you have something spreadable and dreamy.
- Assemble like a pro:
- Level any domes with a serrated knife, stack the layers with frosting between them, then apply a thin crumb coat and chill for 10 minutes before the final layer.
- Create the silhouette:
- Place your Betty Boop stencil under parchment paper, trace the outline with melted chocolate, and let it set completely before carefully peeling it off.
- The grand finale:
- Transfer that chocolate silhouette onto the center of your frosted cake, press gently, and add any final decorations like rosettes or edible glitter.
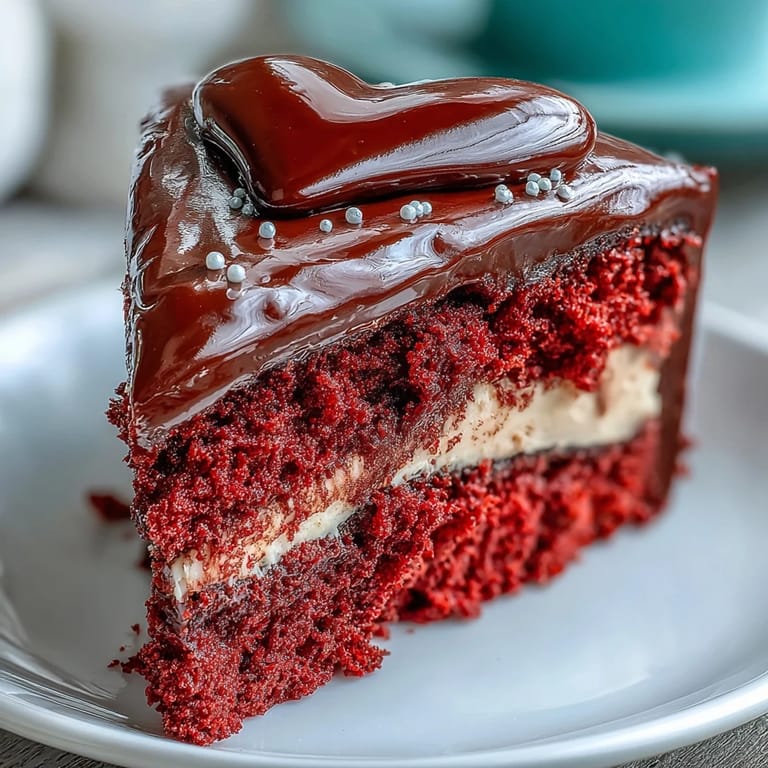 Pin it
 Last Valentine's, I made this for a dinner party and watched my friend's face light up when she saw the Betty Boop silhouette. She told me about how her grandmother used to watch those old cartoons with her every Saturday morning, and suddenly this wasn't just a cake anymore, it was a tiny time machine. That's the thing about food with personal touches, it becomes an invitation for people to share their own stories while they eat.
Working with Chocolate Silhouettes
Temperatures matter more than you'd expect when working with chocolate decorations. If your kitchen is too warm, the chocolate won't set properly, and if it's too cold, it might crack when you try to transfer it. I've found that 68-70°F is the sweet spot, and working in small batches keeps the chocolate from seizing up while you trace those detailed outlines.
Frosting Techniques That Actually Work
After years of fighting with crumb coats and air bubbles, I discovered that heating my offset spatula under hot water and wiping it dry creates the smoothest finish possible. The warm metal slightly melts the frosting surface, erasing any spatula marks and giving you that professional bakery look without any special tools or techniques.
Make Ahead Strategy
The beauty of this cake is that almost every component can be prepared in advance, which saves you from that last-minute kitchen panic. Cake layers freeze beautifully for up to a month wrapped tightly in plastic, and the frosting keeps in the refrigerator for three days if stored properly.
- Make your chocolate silhouette up to a week ahead and store it between parchment paper in an airtight container.
- Thaw frozen cake layers in the refrigerator overnight, not on the counter, to prevent condensation from making them soggy.
- Always bring your frosted cake to room temperature for at least 30 minutes before serving, otherwise the frosting will taste cold and the texture won't be as velvety.
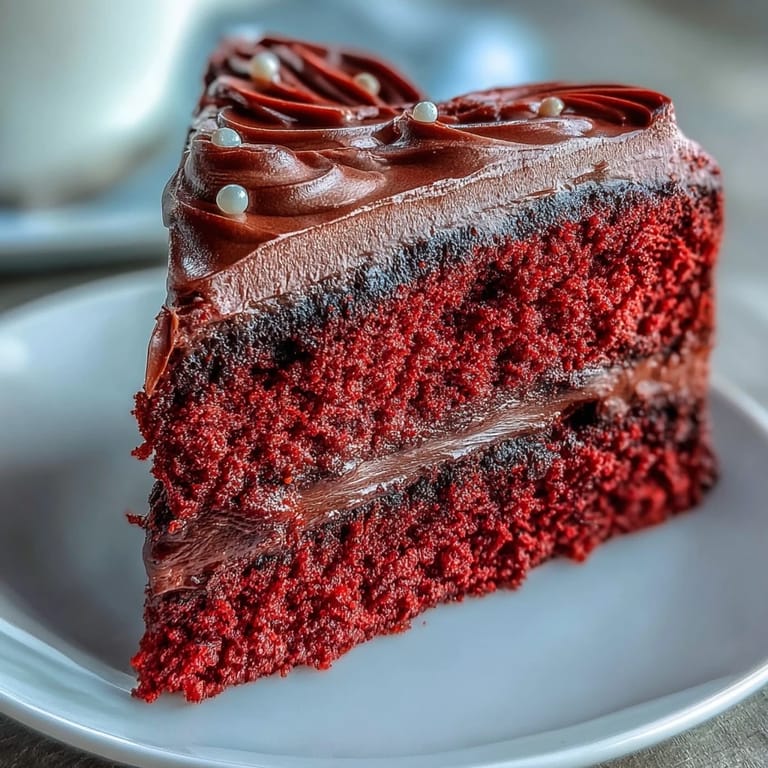
 Pin it
 There's something genuinely satisfying about cutting into that first slice and seeing the contrast between the bright red crumb and dark chocolate silhouette against the white frosting. This cake has become my go-to for celebrations that call for a little bit of nostalgia and a whole lot of joy.
Recipe FAQs
- → Why use gel food coloring for the red cake?
Gel-based food coloring is recommended as it provides a vibrant red hue without altering the consistency of the cake batter, ensuring a perfectly textured crumb.
- → How can I ensure my cream cheese frosting is smooth and lump-free?
Start with room temperature cream cheese and butter for easier blending. Beat them until very smooth before gradually adding powdered sugar. For an even smoother finish, lightly warm your offset spatula before use.
- → Can I prepare parts of this cake in advance?
Yes, the cake layers can be baked a day ahead, wrapped well, and stored at room temperature. The chocolate silhouette can also be made in advance and kept in a cool, dry place. The finished cake keeps well refrigerated for up to 4 days.
- → What if I don't have heart-shaped cake pans?
You can use two standard 9-inch round cake pans instead. The baking time will be similar. After cooling, you can trim the round cakes to create a heart shape if you wish.
- → Why is vinegar included in the cake ingredients?
The vinegar reacts with the baking soda in the batter, creating carbon dioxide bubbles that help the cake rise and contribute to its wonderfully soft and airy texture.