 Pin it
 There's something about pulling a tray of warm scones from the oven that makes the entire kitchen smell like a proper English tearoom. My mum taught me these years ago, but the real magic happened the first time I got the texture exactly right—that delicate crumb that practically melts on your tongue. What I didn't expect was how quickly they'd disappear once friends discovered I'd mastered them, or how a simple afternoon could transform into something memorable just by setting out cream and jam. These scones have become my quiet rebellion against complicated baking; they ask so little of you but deliver something utterly luxurious.
I made these for my neighbor after her surgery, and watching her face light up when she bit into one still makes me smile. She'd mentioned missing proper British afternoon tea, and suddenly I was in my kitchen on a Tuesday morning, measuring flour and thinking about how food carries more than just flavor. The scones were still warm when I brought them over, and somehow that small gesture opened a friendship I treasure now.
Ingredients
- All-purpose flour (2 cups/250 g): This is your foundation, and it needs to stay cool—warm flour fights against tender scones, so some bakers even chill it beforehand.
- Granulated sugar (1/4 cup/50 g): Just enough sweetness to let the butter and cream shine without making these taste like cake.
- Baking powder (1 tablespoon): Your leavening agent; don't skip it or use old powder that's lost its lift, and make sure it's fresh because it directly affects how much rise you get.
- Fine sea salt (1/2 teaspoon): This small pinch balances everything and brings out the subtle butter flavor that makes these special.
- Cold unsalted butter (1/2 cup/115 g), cubed: Cold is non-negotiable here—this is what creates those tender flakes, so cut it into small cubes straight from the fridge and work quickly.
- Whole milk (2/3 cup/160 ml), plus extra for brushing: The moisture that brings everything together; keep it at room temperature so it mixes evenly with the dry ingredients.
- Large egg (1): This adds richness and helps bind the dough slightly without making it tough.
- Pure vanilla extract (1 teaspoon): A small whisper of flavor that deepens the overall taste in a way you can't quite identify but definitely notice.
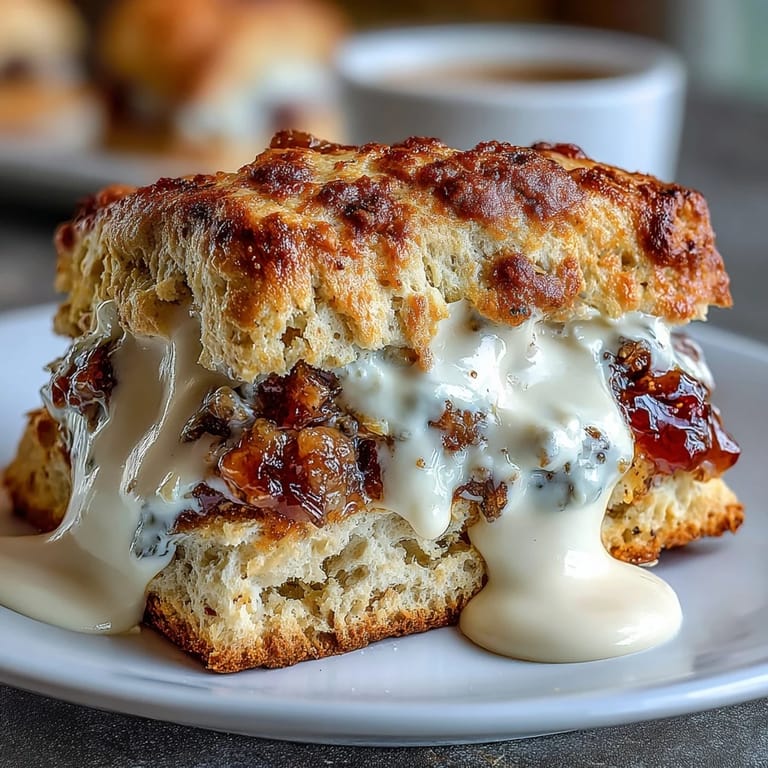
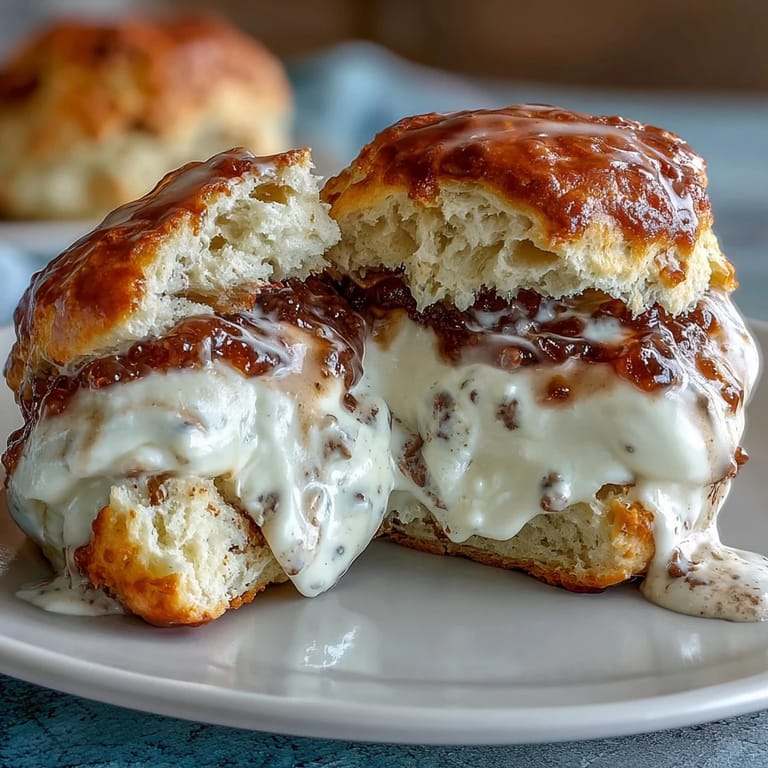
- Clotted cream (1 cup/240 ml) and quality fruit jam (1 cup/320 g): These are the finale, so choose ones you actually enjoy—strawberry and raspberry are classics, but your preference matters most.
Tired of Takeout? 🥡
Get 10 meals you can make faster than delivery arrives. Seriously.
One email. No spam. Unsubscribe anytime.
Instructions
- Set your stage:
- Preheat the oven to 425°F (220°C) and line your baking sheet with parchment paper—this prevents sticking and ensures even browning on the bottoms.
- Build your dry mixture:
- Whisk together flour, sugar, baking powder, and salt in a large bowl, making sure everything is evenly distributed so the baking powder doesn't create any bitter streaks.
- Work in the butter:
- Add the cold cubed butter and use a pastry cutter or your fingertips to rub it into the flour until it resembles coarse breadcrumbs; this step takes patience, but it's what creates those precious flaky layers everyone craves.
- Mix the wet ingredients:
- In a separate bowl, whisk together milk, egg, and vanilla until they're well combined and ready to wake up your dry mixture.
- Bring it together gently:
- Pour the wet mixture into the dry ingredients and use a fork to stir just until combined—this is where overworking is your enemy, so resist the urge to knead or mix thoroughly. Stop as soon as you see no dry flour.
- Shape your scones:
- Turn the dough out onto a lightly floured surface and gently pat it into a 1-inch thick round; the dough should be tender and slightly sticky, which means you've done everything right.
- Cut and place:
- Using a 2.5-inch round cutter, stamp out 8 rounds and place them on your prepared baking sheet, gathering scraps gently and re-rolling once to get a couple more if needed.
- The milk wash:
- Brush each scone top lightly with milk for a subtle golden sheen that looks intentional and professional.
- Bake to golden perfection:
- Bake for 12 to 15 minutes, watching for them to rise beautifully and turn a warm golden color on top—they should look touchable and smell absolutely divine.
- Cool and serve:
- Transfer to a wire rack and let them cool for just a few minutes; they're best served warm, split in half, with generous dollops of clotted cream and your chosen jam.
 Pin it
 There was an afternoon when my daughter insisted on helping me make these, and her tiny hands carefully pressing the cutter into the dough taught me that baking isn't just about precision—it's about moments. She got flour everywhere, mixed a bit too enthusiastically, and her scones came out slightly lumpy and absolutely perfect because she'd made them with joy. That's when I realized these little cakes are more than a recipe; they're an invitation to slow down and be present with someone.
The Spring Tea Tradition
Afternoon tea isn't really about the time of day; it's about the ritual of pausing, gathering, and celebrating simple goodness. Scones anchor that tradition because they're humble enough to not demand attention but elegant enough to make an ordinary Wednesday feel special. I've learned that serving warm scones is almost an apology and a greeting wrapped into one gesture—it says I wanted to create something for you.
Temperature and Timing Matter
Getting the oven temperature right is crucial; too cool and your scones spread into flat cakes, too hot and they brown before they rise. The 425°F sweet spot gives them time to puff up from the baking powder while developing that gorgeous golden exterior. I used to overthink this, but I've discovered that an oven thermometer takes the guesswork away and makes every batch reliable.
Variations and Personal Touches
Once you master the basic technique, these scones become your canvas for creativity. I've added lemon zest, a hint of cardamom, and even dried lavender depending on the season and mood. The beauty is that the structure stays solid while the flavor can absolutely dance.
- Replace half the milk with heavy cream for extra richness and a more decadent crumb.
- Swap jam for lemon curd, honey, or even a homemade compote if you're feeling adventurous.
- Freeze unbaked scones on a tray, then pop them directly into the oven for fresh-baked scones whenever you want them.
 Pin it
 These scones have become my answer to almost every occasion—a way to say thank you, I'm thinking of you, or simply let's slow down together. They remind me that some of the best moments happen not when you're chasing perfection, but when you're confident enough to keep things simple.
Recipe FAQs
- → What makes these scones tender?
Using cold butter and gently mixing the wet and dry ingredients helps create a tender, flaky texture by keeping the fat well distributed.
- → Can I substitute clotted cream?
Yes, thick cream or mascarpone can be used as alternatives, though clotted cream is preferred for its rich, silky texture.
- → How do I achieve a golden crust?
Brushing the scones lightly with milk before baking promotes a golden, shiny finish on top.
- → Is it necessary to chill the dough?
Chilling isn’t required but resting the dough briefly can enhance the texture and ease handling.
- → How should scones be stored?
Store in an airtight container at room temperature for up to two days or freeze for longer freshness.